Unveiling the Magic of Stained Glass Cookies: A Kid-Friendly Gummy Twist
Imagine a cookie that's not just delicious, but also a tiny work of art – vibrant, translucent, and utterly captivating. That's the magic of
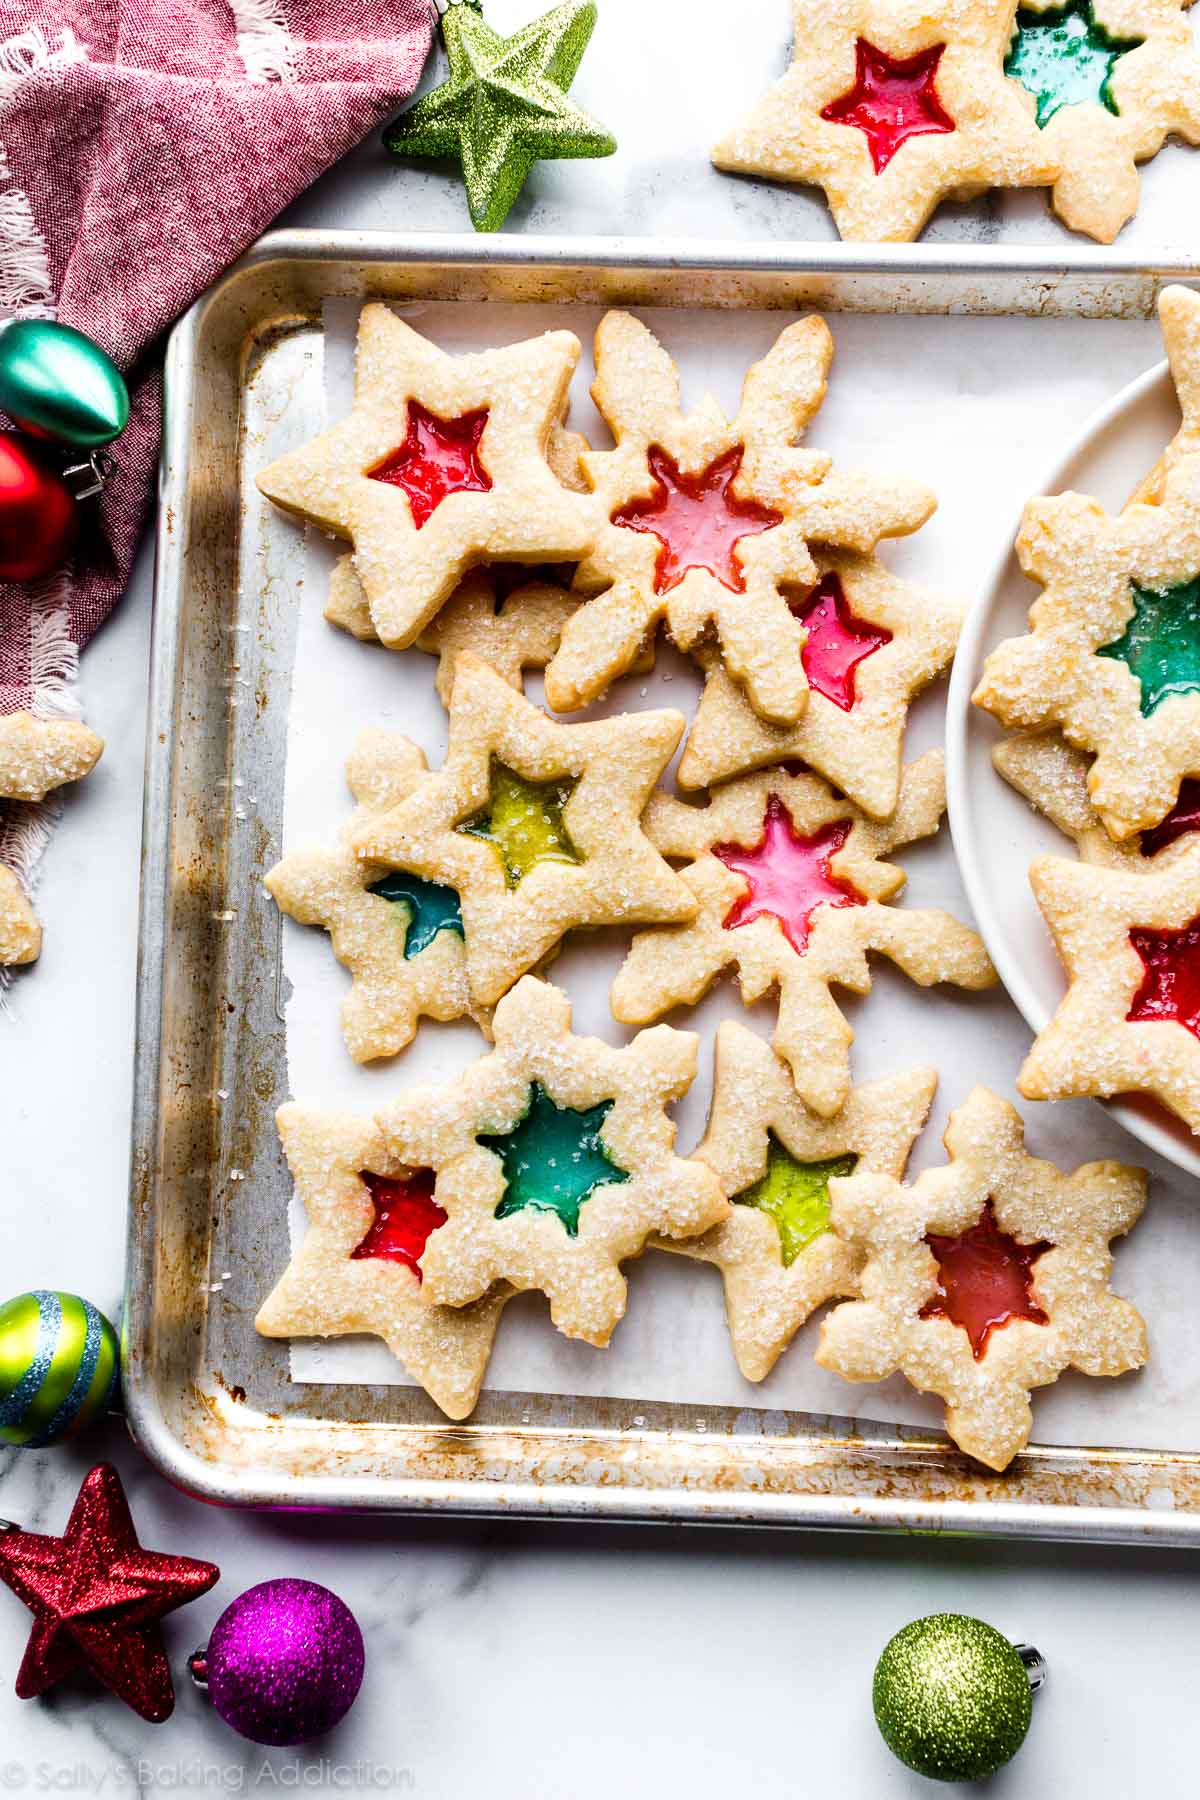
stained glass cookies! These enchanting treats combine the comforting taste of a buttery sugar cookie with a dazzling, see-through center that truly mimics the beauty of stained glass windows. While traditional recipes often call for hard candies to create this effect, we're diving into a much more kid-friendly and tooth-friendly alternative: gummy candies!
This recipe transforms a classic into a modern marvel, perfect for holiday platters, cookie exchanges, or simply a fun baking project with the little ones. Gone are the days of worrying about tooth-breaking hardness; our gummy-centered
stained glass cookies boast a delightful chewiness that complements the soft cookie base. They're not just visually stunning; they're an absolute joy to eat, bringing smiles and a burst of fruity flavor with every bite. If you're looking for an impressive yet surprisingly simple way to elevate your baking game, especially with children, then these chewy, colorful creations are your perfect next project. For more insights into making these delightful treats, check out our guide on
Chewy & Colorful: Make Stained Glass Cookies with Gummy Candy.
Why Gummy Candies are the Secret Ingredient for Superior Stained Glass Cookies
The choice of filling for your
stained glass cookies is crucial, and here's why gummy candies are the clear winner, especially when baking with kids:
*
Soft, Chewy, and Tooth-Friendly: Hard candy centers, while beautiful, can be a hazard, often leading to broken teeth or discomfort, particularly for children. Gummy candies, however, melt into a wonderfully pliable, chewy, and fruit-flavored center that's a pleasure to bite into. This makes them much safer and more enjoyable for everyone.
*
Vibrant, Playful Colors: Gummy candies come in an astonishing array of bright, appealing colors. When melted, they create a translucent "glass" effect that's incredibly vivid and festive. You can mix and match colors to create unique patterns or stick to single hues for a monochromatic elegance.
*
Fun for Little Hands: Preparing the gummy candies (slicing them into smaller pieces) is a task even young children can safely assist with (under supervision), making them more engaged in the entire baking process. This interactive element adds to the overall fun of making these beautiful cookies.
*
No-Spread Cookie Base: Our recipe utilizes a no-spread sugar cookie dough, ensuring your intricately cut shapes remain perfect during baking. This provides a beautiful frame for your vibrant gummy "windows."
The combination of a tender, buttery sugar cookie and a vibrant, chewy gummy center makes these cookies irresistible. They look like they took hours of intricate work, but with our straightforward method, you'll be amazed at how easily these edible masterpieces come together. They're truly the star of any cookie tray, especially during the holidays. For more festive inspiration, don't miss our tips on
Easy Holiday Stained Glass Cookies for Your Festive Platter.
Gather Your Tools and Ingredients for Stained Glass Cookie Success
Before you embark on your stained glass cookie adventure, ensure you have all your components ready. A little preparation goes a long way in making the process smooth and enjoyable.
Essential Ingredients:
*
Cold Unsalted Butter: Using cold butter is key for a no-spread sugar cookie, ensuring your intricate shapes hold perfectly. Unsalted butter gives you control over the overall saltiness.
*
White Granulated Sugar: Provides the sweetness and helps with the tender texture of the cookie.
*
Eggs (Yolk and One Full Egg): The egg yolk adds richness and helps create a tender crumb, while the additional full egg provides structure and moisture.
*
Vanilla Extract: Essential for that classic, comforting sugar cookie flavor. A good quality vanilla makes all the difference.
*
Salt: A pinch of salt balances the sweetness and enhances all the other flavors in the cookie dough.
*
All-Purpose Flour: The foundation of our cookie dough. Ensure it's measured correctly for the best texture.
*
Assorted Gummy Candies: This is where the magic happens! Gummy bears, gummy worms, or any other colorful gummy candy will work beautifully. Choose a variety of colors for maximum visual impact.
Necessary Kitchen Tools:
*
Baking Sheets: At least two, lined with parchment paper for easy release and cleanup.
*
Electric Mixer (Stand or Handheld): For creaming butter and sugar, and mixing in eggs. A stand mixer is ideal for the thicker dough.
*
Large Mixing Bowls: For combining ingredients.
*
Rubber Spatula or Wooden Spoon: For scraping down bowls and mixing.
*
Rolling Pin: For evenly rolling out the cookie dough.
*
Cookie Cutters: You'll need two sizes: a larger one (around 3 inches, e.g., a circle, star, or square) for the outer cookie shape, and a smaller one (1.5-2 inches, e.g., a mini star, heart, or holiday shape) for cutting out the center where the "glass" will go.
*
Sharp Knife or Kitchen Shears: For cutting your gummy candies into smaller pieces.
*
Wire Cooling Rack: For cooling the finished cookies.
Step-by-Step Guide to Crafting Your Gummy Stained Glass Cookies
Follow these detailed steps to create stunning
stained glass cookies that are as fun to make as they are to eat.
1.
Prepare Your Workspace: Preheat your oven to 350˚F (175˚C). Line your baking sheets with parchment paper. Clear a large, clean surface for rolling out your dough.
2.
Cream Butter and Sugar: In a large mixing bowl, cream the cold butter and white sugar together using an electric mixer on low-medium speed for 2-3 minutes, until light and fluffy.
3.
Add Egg and Vanilla: Separate one egg, keeping the yolk. In a separate small bowl, combine the egg yolk, a second full egg, and vanilla extract. Whisk briefly with a fork. Gradually add this egg mixture to your creamed butter and sugar, mixing until just blended.
4.
Incorporate Dry Ingredients: Add the all-purpose flour and salt to the wet mixture. Mix on low speed with a stand mixer or a sturdy spatula until a thick dough forms. *Avoid using a hand mixer for this stage as the dough becomes very dense.*
5.
Roll and Cut Dough: On a lightly floured surface or a silicone baking mat, roll out the cookie dough to an even thickness of about ⅜ inch. Use your larger cookie cutter (e.g., a 3-inch circle) to cut out the main cookie shapes. Then, use your smaller cookie cutter (e.g., a 1.5-2 inch star) to cut out the center from each large cookie.
*
Optional Ornament Detail: For a charming touch, take a small bean-sized piece of dough, roll it into a ball, flatten it, and gently press it onto the top of your main cookie shape. Use a wooden skewer or toothpick to create a small hole through this flattened piece, mimicking a hanging ornament.
6.
Arrange and Bake: Carefully transfer your cut cookie dough shapes to the prepared baking sheets, leaving a little space between them. Bake for 9-11 minutes, or until the edges are just set and very lightly golden, but the centers still look light. *Do not overbake, as they will continue to cook slightly on the hot pan.*
7.
Prepare Gummy Centers: While the cookies are baking or immediately after they come out, use a sharp knife or kitchen shears to slice your gummy candies into small pieces – think slightly larger than sprinkles. Mix different colors or keep them separated for a specific design.
8.
Melt the Gummy "Glass": This is the crucial step! As soon as the cookies come out of the oven, while they are still piping hot on the baking sheet, quickly and generously sprinkle the cut gummy pieces into the empty cutout centers of each cookie. The residual heat from the cookies and the pan will begin to melt the gummies. If the gummies haven't fully melted and spread to fill the cutout within 2-3 minutes, you can carefully return the baking sheet to the oven for an additional 1-2 minutes, keeping a close eye on them to prevent burning. The goal is a smooth, translucent, colorful center.
9.
Cool Completely: Allow the cookies to cool completely on the baking sheet. *This is vital* – the gummy centers need time to set and harden back into a stable "glass" consistency. Once fully cooled, carefully transfer them to a wire rack.
Tips for Perfect Stained Glass Cookies Every Time
Achieving beautiful, bakery-worthy
stained glass cookies is easier than you think with a few expert tips:
* **Dough Chilling is Optional, but Recommended:** While this recipe is designed for a no-spread cookie, chilling the dough for 30 minutes to an hour can further firm it up, making it easier to handle and ensuring even sharper cutouts.
* **Uniform Thickness:** Rolling your dough to an even ⅜-inch thickness is critical. This ensures all cookies bake at the same rate and the centers are deep enough for a good amount of gummy "glass." Use rolling pin guides if you have them.
* **Don't Overwork the Dough:** Overworking the dough can lead to tough cookies. Mix until just combined.
* **Gummy Candy Variety:** Experiment with different types of gummy candies! Some will melt more smoothly than others. Small, softer gummies tend to work best. You can even layer colors for a marbled effect.
* **Re-rolling Scraps:** Gather dough scraps, gently press them together, and re-roll. You might get a slight difference in texture after multiple re-rolls, but it’s an efficient way to use all your dough.
* **Clean Cookie Cutters:** If dough starts sticking, dip your cookie cutters in a little flour between cuts.
* **Handling Hot Cookies:** Be gentle when transferring and adding gummies to hot cookies. The dough is tender when warm.
* **Avoid Overfilling:** Don't pile the gummies too high, as they might bubble over the edges when melted. Fill them just below the dough's surface.
Beyond the Bake: Storage, Gifting, and Enjoying Your Creations
Once your stunning
stained glass cookies have cooled and set, the fun continues!
* **Storage:** Store these cookies in an airtight container at room temperature for up to 5-7 days. To prevent them from sticking together, you can place a piece of parchment paper between layers. Avoid refrigerating, as it can alter the texture of the cookies and the gummy centers.
* **Gifting:** These cookies make exceptional gifts! Arrange them in a decorative box or tin, perhaps with a piece of tissue paper between each cookie. Their unique beauty is sure to impress friends, family, and neighbors. They're particularly delightful as part of a homemade holiday cookie assortment.
* **Cookie Platters:** Stained glass cookies are the ultimate showstopper on any dessert platter. Their vibrant colors and artistic flair instantly elevate the presentation, making them a centerpiece that invites admiration and conversation.
* **Family Traditions:** Baking these cookies can become a beloved family tradition. Children adore the hands-on process, from cutting shapes to sprinkling colorful gummies, and they’ll be proud to share their edible art.
There’s something truly magical about biting into a cookie that's as beautiful as it is delicious. These kid-friendly gummy
stained glass cookies offer a delightful blend of tender cookie and chewy, fruity "glass," making them a perfect project for bakers of all ages. So, gather your ingredients, unleash your creativity, and get ready to bake some edible sunshine!