Easy Holiday Stained Glass Cookies for Your Festive Platter
As the holiday season draws near, the air fills with the delightful aroma of freshly baked treats, and our thoughts turn to crafting a truly magical spread for loved ones. Among the countless festive confections, few capture the spirit of holiday wonder quite like stained glass cookies. These edible masterpieces aren't just delicious; they’re miniature works of art that sparkle and shine, transforming any cookie platter into a vibrant spectacle. Imagine a cookie that not only tastes incredible but also boasts a mesmerizing, jewel-toned center that catches the light like a tiny stained glass window.
This article will guide you through creating these show-stopping holiday stained glass cookies, emphasizing a unique twist that makes them even more enjoyable: a soft, chewy, fruity center that’s gentle on the teeth and bursting with flavor. Forget the hard-candy crunch; prepare for a delightful, melt-in-your-mouth experience that will impress both young and old alike.
Why Stained Glass Cookies Are a Holiday Must-Have
There's a reason stained glass cookies consistently make an appearance on festive tables and in holiday cookie exchanges. They offer an unparalleled combination of visual appeal and delicious taste:
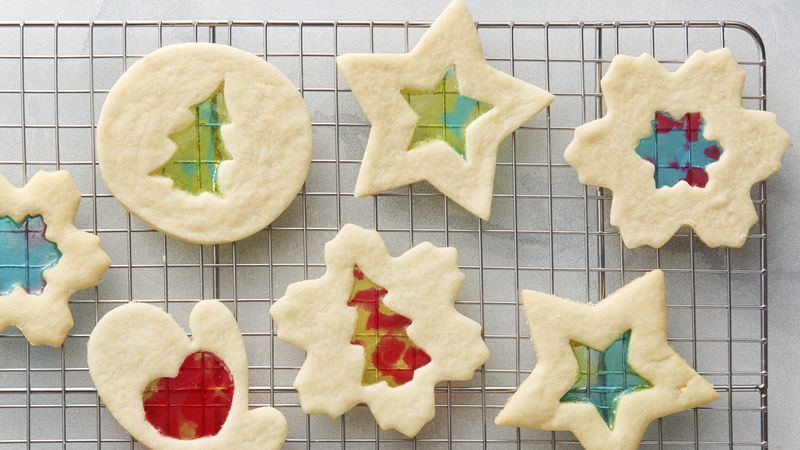
- Soft, Pretty Cookie Base: At their heart, these are buttery, tender cutout sugar cookies. Our recipe ensures a no-spread dough, meaning your intricate shapes will hold perfectly, providing a beautiful frame for the colorful center. This classic flavor profile makes them universally loved.
- Visually Stunning: The "stained glass" effect is truly enchanting. When placed near a light source, the vibrant, translucent centers glow, adding an artistic touch to your festive platter. They're instant conversation starters and proof that baking can indeed be an art form.
- A Unique Chewy & Fruity Center: While many traditional stained glass cookies rely on crushed hard candies, our preferred method utilizes gummy candies. This ingenious swap results in a chewy, satisfyingly fruity center that's not only delicious but also much more pleasant to eat. No more worries about cracked teeth – just pure, soft, candy-like bliss. It truly makes these stained glass cookies accessible and enjoyable for everyone, from toddlers to grandparents.
- Fun for All Ages: From rolling out the dough to cutting shapes and arranging the gummy candy, making stained glass cookies is a wonderfully interactive activity. Kids especially love selecting their favorite gummy colors and watching them melt into beautiful, translucent windows in the oven. It's a fantastic way to create lasting holiday memories together.
- Perfect for Gifting and Sharing: Their eye-catching appearance makes them ideal for cookie exchanges, hostess gifts, or simply sharing with neighbors. Package them in clear cellophane bags with a festive ribbon, and you have a handmade gift that looks professionally crafted and tastes homemade.
The Secret to a Perfect Chewy "Stained Glass" Center
The magic of these cookies truly lies in their vibrant, translucent centers. While hard candies are a common choice, we advocate for using gummy candies for several compelling reasons. The reference context hints at this, noting that hard candy "really hurts your teeth." This is a significant consideration, especially when baking for families with children or older guests.
Gummy bears, gummy worms, or any other soft, fruit-flavored gummy candies are fantastic. Here's why they're superior:
- Chewy Texture: Unlike brittle hard candy, gummies melt into a soft, pliable, and wonderfully chewy texture that mirrors the chewiness of the cookie itself. This creates a harmonious mouthfeel.
- Kid-Friendly & Safer: As mentioned, hard candies can be a choking hazard for small children and painful for anyone with sensitive teeth. Gummies eliminate this concern, making the stained glass cookies enjoyable for everyone without hesitation.
- Easier to Work With: Cutting gummies into small pieces is much safer and simpler than crushing hard candies, which can create sharp fragments and uneven melting. A pair of kitchen shears makes quick work of gummy prep.
- Vibrant, Consistent Colors: Gummy candies retain their bright, distinct colors beautifully when melted, creating gorgeous, jewel-like windows without much effort. You can mix and match to create stunning multi-colored centers.
When choosing your gummy candies, opt for ones with clear, bright colors. Avoid overly opaque gummies or those with white centers if you want the best translucent effect. This simple ingredient swap elevates these stained glass cookies from merely pretty to truly delightful.
Gathering Your Ingredients for Culinary Sparkle
To embark on your stained glass cookie adventure, you'll need a combination of pantry staples and that special ingredient for the "glass."
Essential Cookie Dough Ingredients:
- Cold Unsalted Butter: Using cold butter is crucial for a no-spread cutout sugar cookie. It helps keep the dough firm, ensuring your intricate cookie cutter shapes hold their form during baking.
- White Granulated Sugar: Provides sweetness and helps achieve that classic sugar cookie texture.
- Eggs & Vanilla Extract: Eggs bind the dough and add richness. Vanilla extract, especially a good quality pure vanilla, contributes significantly to the cookie's comforting flavor. Consider adding a touch of almond extract or lemon zest for an extra layer of flavor complexity during the holidays.
- All-Purpose Flour: The structural backbone of your cookies. Measure it correctly – spooned into the cup and leveled – to avoid dense or dry cookies.
- Salt: A pinch of salt balances the sweetness and enhances all the other flavors.
The "Stained Glass" Element:
- Gummy Candies: As discussed, this is where the magic happens! Gummy bears, gummy worms, or any other soft, colorful gummy candy will work perfectly. Choose a variety of colors to create a truly vibrant effect.
Pro Tip: Ensure all your ingredients are fresh for the best results. Good quality butter and vanilla make a noticeable difference in the final taste of your stained glass cookies.
Step-by-Step Guide to Crafting Edible Art
Creating these beautiful stained glass cookies is a straightforward process, perfect for a joyful afternoon of holiday baking. Here’s a detailed breakdown:
1. Prep & Dough Magic
- Preheat & Prepare: Preheat your oven to 350°F (175°C). Line several baking sheets with parchment paper or silicone baking mats. Clear a generous workspace on your counter.
- Cream Butter & Sugar: In a large mixing bowl, cream together the cold unsalted butter and white sugar until light and fluffy. If using a stand mixer, beat on medium-low for 2-3 minutes. If mixing by hand, use a mashing motion with a spatula.
- Add Wet Ingredients: Separate one egg, placing the white in a small bowl (you'll use this later for an optional glaze or discard) and the yolk in a second bowl. Crack in a second full egg into the yolk bowl, along with the vanilla extract. Whisk this mixture thoroughly with a fork. Add the egg and vanilla mixture to the creamed butter and sugar, mixing until fully incorporated and smooth.
- Combine Dry Ingredients: Gradually add the all-purpose flour to your wet mixture, scattering the salt around the bowl. Mix on low speed with a stand mixer, or use a sturdy spatula if mixing by hand, until a cohesive dough forms. Avoid overmixing, which can lead to tough cookies. The dough will be thick – a hand mixer might struggle here.
2. Shaping Your Masterpieces
- Roll Out the Dough: Lightly flour your work surface or use a silicone baking mat. Roll out the cookie dough to a thickness of approximately ⅜ of an inch. This thickness is ideal for holding the candy well and providing a substantial cookie base.
- Cut Shapes: Use a larger holiday cookie cutter (e.g., a 3-inch circle, star, or bell) to cut out your primary cookie shapes. Then, using a smaller holiday cookie cutter (1 ½ to 2 inches – like a mini star, tree, or ornament shape), carefully cut a smaller shape out of the center of each larger cookie.
- Craft an Ornament Loop (Optional): For cookies you might hang or want to look like tree ornaments, take a small piece of dough (about the size of a large bean), roll it into a ball, flatten it, and press it firmly to the top of your main cookie shape. Use a wooden skewer or toothpick to create a small hole through this added piece of dough.
- Arrange on Baking Sheets: Carefully transfer your cutout cookies to the prepared baking sheets, leaving about an inch between each. Re-roll any dough scraps to cut out more cookies until all dough is used.
3. The Gummy Transformation
- Pre-Bake the Cookies: Bake the cookies in the preheated oven for 9 to 11 minutes. They should be *almost* done, appearing set but still very light in color, not browned. This partial bake prevents the gummies from burning.
- Prepare Gummy "Glass": While the cookies are baking, finely slice your gummy candies into the smallest pieces you can manage – think just slightly larger than a sprinkle. A good pair of kitchen shears makes this task much easier and faster than a knife. Separate by color if you want distinct windows.
- Fill with Gummy Candy: As soon as the cookies come out of the oven and are still hot on the pan, carefully and quickly sprinkle your cut gummy candy pieces into the central cutout of each cookie. Fill it generously but not overflowing. The residual heat of the cookies will begin to melt the gummies.
- Return to Oven (Briefly): Place the baking sheets back into the oven for just 2-4 minutes, or until the gummy candy has completely melted and spread to fill the cutout, becoming perfectly translucent and glass-like. Keep a close eye on them to prevent burning.
- Cool Completely: Remove from the oven and let the cookies cool on the baking sheet for at least 10-15 minutes. The candy needs to set and harden. Once firm, gently transfer the stained glass cookies to a wire rack to cool completely. The candy will become firm but still chewy once fully cooled.
Creative Embellishments & Serving Suggestions
Once your stained glass cookies have cooled, they are ready to shine!
- Dusting & Drizzles: A light dusting of powdered sugar can enhance their festive look, resembling freshly fallen snow. Alternatively, a simple vanilla glaze drizzled over the cookie portion (avoiding the candy center) adds an extra touch of sweetness and elegance.
- Display with Light: To truly showcase their beauty, arrange these stained glass cookies on a clear glass plate, allowing light to pass through them. For an extra magical effect, place them near a window or under a gentle lamp.
- Holiday Trees: If you made the ornament-style cookies with a hole, thread them with festive ribbon and hang them on your Christmas tree for an edible decoration (just make sure pets and small children don't get to them too quickly!).
- Gifting: Pack them in decorative tins or clear bags. Pair them with other holiday favorites for a diverse and impressive homemade gift basket.
- Storage: Store stained glass cookies in an airtight container at room temperature for up to a week. Separate layers with parchment paper to prevent sticking.
There's an undeniable joy in baking during the holidays, and creating stained glass cookies is an experience that embodies that festive spirit perfectly. With their dazzling appearance, tender cookie base, and delightful chewy centers, these cookies are more than just a treat; they're a celebration of light, color, and deliciousness. Gather your ingredients, invite your loved ones, and get ready to create edible works of art that will bring smiles and sparkle to your festive platter. Happy baking!
