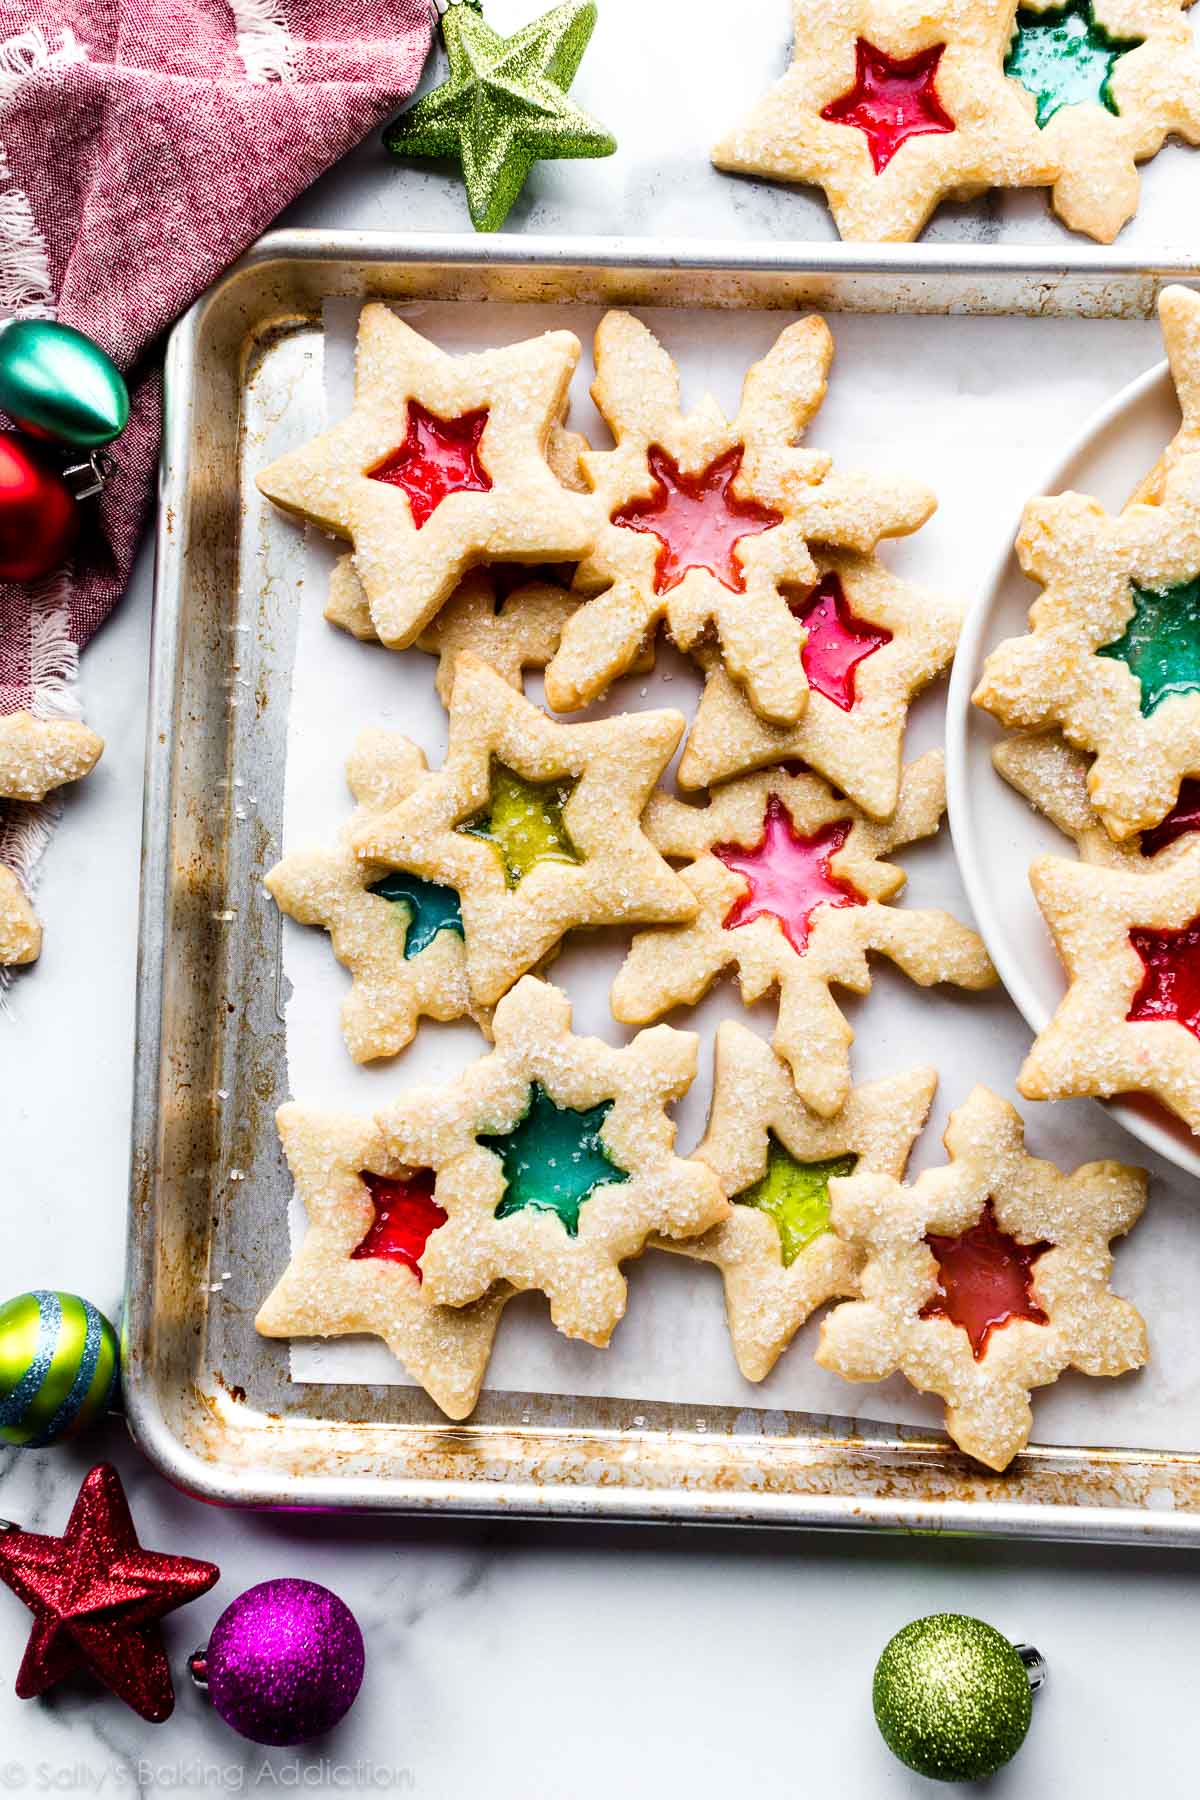
Chewy & Colorful: Make Stained Glass Cookies with Gummy Candy
Imagine biting into a soft, buttery sugar cookie, only to discover a vibrant, chewy, and fruity center that glistens like a jewel. This isn't a dream – it's the magic of
stained glass cookies, reimagined with a delightful twist: gummy candy! Forget the hard, tooth-jarring candy centers of yesteryear; this innovative approach makes for a truly irresistible treat that's as stunning to look at as it is delicious to eat. Perfect for holiday platters, cookie exchanges, or simply a fun baking project with the family, these edible works of art are sure to be a showstopper.
Traditionally,
stained glass cookies feature a transparent window created by melted hard candy. While visually appealing, the texture can often be a bit of a challenge. Our unique method harnesses the sweet, pliable nature of gummy candies, transforming them into a gloriously chewy, vibrant "glass" that's a joy to sink your teeth into. Get ready to embark on a baking adventure that promises both beauty and an incredible burst of flavor, leaving a lasting impression on anyone lucky enough to try them.
What Makes Gummy Stained Glass Cookies So Irresistible?
There's a reason these gorgeous cookies capture hearts and taste buds alike. The combination of classic comfort and whimsical charm makes them truly special, and the gummy candy innovation elevates them to a new level of deliciousness.
*
A Soft, Visually Stunning Cookie Base: Our recipe starts with a perfectly crafted, no-spread cutout sugar cookie dough. This means your beautifully intricate shapes will hold their form, resulting in crisp edges and a soft, tender crumb. The contrast of the golden-brown cookie against the jewel-toned gummy center is simply breathtaking, making them an instant highlight on any dessert table. Imagine a tray filled with these colorful gems – they truly look like miniature works of art, especially when arranged among other festive treats like those you might find in an
Easy Holiday Stained Glass Cookies for Your Festive Platter collection.
*
The Chewy, Fruity Stained Glass Center: This is where the magic truly happens and sets these
stained glass cookies apart. Instead of the rock-hard crunch of traditional candy centers, our gummy rendition offers a pleasant, soft chew with every bite. The gummy candies melt into a translucent, fruit-flavored window that's not only visually captivating but also provides a delightful textural contrast to the buttery cookie. It's a much more enjoyable experience, especially for younger bakers or those with sensitive teeth, transforming a simple sugar cookie into an exciting, multi-sensational treat.
*
Fun for All Ages – A Perfect Family Activity: Baking
stained glass cookies is an incredibly engaging activity that brings joy to both kids and adults. From rolling out the dough and cutting shapes to carefully placing the colorful gummy pieces, there are tasks for every skill level. Children will be mesmerized as the gummies melt and transform in the oven, creating their own edible stained glass masterpieces. It’s a wonderful way to create lasting memories and cultivate a love for baking, making it an ideal choice for a
Kid-Friendly Gummy Recipe baking session. These impressive cookies are guaranteed to be the star of your cookie tray and a talking point at any gathering.
Gathering Your Artisanal Baking Supplies
Creating these dazzling
stained glass cookies requires a thoughtful selection of ingredients for both the robust cookie base and the vibrant, chewy centers.
*
For the Buttery Cookie Dough:
*
Cold, Unsalted Butter: Using cold butter helps create a tender, flaky cookie and prevents the dough from spreading excessively. Unsalted butter gives you complete control over the salt content in your recipe.
*
Granulated Sugar: Provides sweetness and contributes to the cookie's structure and golden color.
*
Eggs: Essential for binding the ingredients, adding richness, and creating a soft texture. Our specific method involves one egg yolk and one whole egg, ensuring a tender and flavorful dough.
*
Vanilla Extract: A crucial flavor enhancer that complements the buttery goodness of the cookie.
*
Salt: A pinch of salt balances the sweetness and brings out the other flavors in the cookie.
*
All-Purpose Flour: The foundational ingredient that gives the cookies their structure. Ensure it’s accurately measured, preferably by weight, for consistent results.
*
For the Dazzling Gummy "Glass":
*
Gummy Candies: This is your artistic palette! Gummy bears, gummy worms, fruit slices, or any other colorful gummy candy will work perfectly. The key is variety in color to achieve that true stained glass effect. Choose your favorites, or select a mix that complements your theme (e.g., red and green for Christmas, pastels for spring). Consider using different brands or types to see how they melt differently – some might yield a slightly clearer "glass" than others.
Crafting Your Edible Masterpieces: A Step-by-Step Guide
Bringing these beautiful
stained glass cookies to life is a delightful process. Follow these steps carefully to ensure success.
1.
Prepare Your Workspace and Oven: Begin by preheating your oven to 350°F (175°C). Line several baking sheets with parchment paper; this prevents sticking and makes for easy cleanup. Clear a generous area of counter space for rolling out your dough, and ensure all your ingredients are measured and ready.
2.
Cream the Butter and Sugar: In a large mixing bowl, combine the cold unsalted butter (cut into cubes) and granulated sugar. Using an electric mixer on low-medium speed, or by hand with a sturdy spatula in a mashing motion, cream them together for 2 to 3 minutes until the mixture is light, fluffy, and pale in color. This incorporates air, which contributes to the cookie's tender texture.
3.
Incorporate Eggs and Vanilla: Carefully separate one egg, placing the yolk in a small bowl and the white in another (you won't need the white for this recipe). To the bowl with the yolk, crack and add a second whole egg, along with the vanilla extract. Beat this mixture gently with a fork or whisk until well combined. Gradually add the egg mixture to your creamed butter and sugar, mixing until just blended. Scrape down the sides of the bowl to ensure everything is fully incorporated.
4.
Add Dry Ingredients to Form Dough: To the wet mixture, add the all-purpose flour and scatter the salt evenly over the top. Mix on low speed with a stand mixer (fitted with a paddle attachment) or a sturdy spatula until a cohesive dough forms. The dough will be thick, so avoid using a hand mixer at this stage as it may strain the motor. Mix until just combined; overmixing can lead to tough cookies.
5.
Roll and Cut Your Cookie Shapes: Lightly flour your clean counter space or use a silicone baking mat. Divide your dough in half and roll out one portion to an even thickness of about ⅜ of an inch. This thickness is crucial for supporting the melted gummy center. Use a 3-inch cookie cutter to cut out your main cookie shapes. Then, using a smaller holiday-themed cookie cutter (1 ½ to 2 inches) or a simple round cutter, cut out the center from each larger cookie.
6.
Create Ornament Hangers (Optional): For extra charm, especially during the holidays, you can transform these into edible ornaments. Take a small piece of dough, about the size of a large bean, roll it into a ball, flatten it slightly, and press it gently to the top of your circular cookie. Then, use a wooden skewer or a thin straw to carefully create a small hole through this added piece, mimicking an ornament hanger.
7.
Bake the Cookie Bases: Carefully transfer your cut cookies (and any re-rolled scraps) to the prepared baking sheets. Bake in the preheated oven for 9 to 11 minutes. The cookies should be almost done, with just a hint of golden color around the edges, but still soft and light in the center. They will firm up as they cool slightly. Remove from the oven but leave them on the hot baking sheets.
8.
Add the Gummy "Glass" and Final Bake: While the cookies are still hot on the pan, quickly slice your chosen gummy candies into the smallest pieces you can manage – think slightly larger than a sprinkle. The smaller and more uniform the pieces, the more evenly and beautifully they will melt. Fill the cut-out centers of each hot cookie with a single layer of these gummy pieces. Return the baking sheets to the oven for an additional 2 to 4 minutes, or until the gummies have completely melted and appear glossy and translucent. Watch them closely, as they can burn if overbaked. Once melted, remove the cookies from the oven and let them cool completely on the baking sheets. Do not attempt to move them until they are fully cooled, as the melted gummy center will still be liquid and could easily distort.
Tips for Perfect Stained Glass Cookies Every Time
Achieving truly stunning
stained glass cookies requires a few insider tips and tricks.
*
Precision in Dough Thickness: Ensure your dough is rolled to a consistent ⅜-inch thickness. Too thin, and the cookie might become brittle around the melted center; too thick, and the cookie might be underbaked by the time the gummies melt.
*
Gummy Candy Prep is Key: Slice your gummy candies into small, uniform pieces. This is arguably the most important step for an even, beautiful "glass" effect. Large or uneven pieces will melt inconsistently, leading to lumps or incomplete transparency.
*
Don't Overfill the Center: A single, relatively flat layer of gummy pieces is best. Overfilling can cause the melted candy to overflow or create a thick, clumpy center that doesn't look as refined.
*
Watch the Gummies Closely: The second bake, where the gummies melt, happens quickly. Keep a close eye on your oven. As soon as they are fully melted and appear glossy, remove them. Overbaking can cause the gummies to caramelize too much, bubble excessively, or even burn, resulting in a dark, bitter flavor.
*
Cool Completely on the Pan: Patience is a virtue here! The melted gummy centers are very fragile when hot. Allow the cookies to cool completely on the baking sheets. As they cool, the gummies will harden into their translucent "glass" form, making the cookies sturdy enough to handle.
*
Storage: Once cooled, store your
stained glass cookies in an airtight container at room temperature. They tend to stay fresh and chewy for several days. If they become sticky, separating them with parchment paper can help.
*
Experiment with Colors and Shapes: Don't limit yourself to holiday themes! Use different colored gummies to create rainbows, ombre effects, or specific color schemes for birthdays or other celebrations. Varying the small inner cookie cutters can also lead to a myriad of unique designs.
These gorgeous
stained glass cookies are a delightful fusion of classic comfort and innovative confectionery. The soft, buttery cookie paired with the chewy, fruit-flavored gummy center creates an experience that is both visually striking and incredibly satisfying. Whether you're baking for a special occasion, a festive gathering, or simply a fun afternoon project, these cookies promise to impress and delight. So roll up your sleeves, gather your ingredients, and get ready to create some truly magical, edible stained glass art!